How to Install LineageOS 20 GSI on the Kompakt
WARNING This is a fairly extensive guide, please make sure you understand what you are doing before proceeding. It will require you wiping your device and all data. There is a backup tool provided but I won’t be able to help with all the platform and software oddities of the tools used here.
This guide details the process of installing LineageOS 20 (Android 13) GSI build (lineage-20.0-X-UNOFFICIAL-arm64_X.img) on the Mudita Kompakt. This version has been tested and is known to work on a global Kompakt. The latest security patch is from October, 2025.
Note: I’ve tried LineageOS 20 but LineageOS 21 or 22 may work too, but have not been tested. To try a newer version, follow these same steps using the newer image.
This should provide a vanilla Android experience: notifications, configurability, Google app support, and root access if you desire. Third party apps are more likely to work as well.
This is a fairly generic way to do this. If you’re worried, there will be further development down the line to make this a bit easier and more of and “out of the box experience” for Lineage on this device - stay tuned.
Prerequisites
- A Mudita Kompakt on version 1.1.1
- Unfortunately, something around the versions Mudita provided after this release make it difficult to install Android GSI. I would love to hear if there’s a solution to this from Mudita. In order to downgrade you will use
mtkclient(or adb works too - but since you will want to backup it will be easier) - (GitHub - bkerler/mtkclient: Mediatek Flash and Repair Utility · GitHub) and its requirements (Windows, Linux or macOS) installed
- Unfortunately, something around the versions Mudita provided after this release make it difficult to install Android GSI. I would love to hear if there’s a solution to this from Mudita. In order to downgrade you will use
- ADB & Fastboot installed on your computer.
- The GSI Image:
lineage-20.0-X-UNOFFICIAL-arm64_X.img- You can download it from Andy Yan's personal builds // GSI - Browse /lineage-20-td at SourceForge.net
- Reading the variants you can decide which one to use, with or without Google apps.
- Three files from this drive:
1.1.1_partitions.zip-boot,dtbo,vbmeta, andvendor_bootimages1.1.1_ota.zip- The OTA image you will flash aftervbmeta.img.empty- Required to disable verified boot, rename it tovbmeta.img- (Patched Magisk
boot.imgif you want to root with Magisk.)
Step 0: Backup your device and rollback to 1.1.1
This is essential! If anything goes wrong you can always re-write your original firmware, data, IMEI, etc back to your device. I won’t get too deep into the details of how to do it, as a lot of the explanation is included in the GitHub repository.
macOS Detail
If you are on macOS you will need to run the client with sudo like sudo python mtk_gui.py after following all the install requirements and activating the Python virtual environment.
The backup will take a long time if you backup your user partition (expect to wait an hour or so).
Using mtkclient
This is assuming you have updated to a later firmware > 1.1.1.
While I’m not entirely sure if there is any compatibility issue, this partition backup was created on with an NA version (thanks a lot Jordan!). I didn’t have any trouble installing and proceeding with my Kompakt global version. And big thanks to @flapke for the OTA and Magisk boots!
Backing up
- Open
python mtk_gui.py(orsudo python mtk_gui.pyon macOS). - Turn off the Kompakt
- Press and hold power and volume down and hold while you plug in a USB-C cable
- Wait until the GUI detects the phone and shows the partitions
- Go to dump (to backup your phone) and dump all partitions.
Go get a coffee ![]()
Rollback partitions to 1.1.1
- Afterwards, unzipped the
1.1.1_partitions. - Instead of selecting all partitions, select only a select few partitions (e.g.
boot,dtbo,vbmeta,vendor_boot) to write from mtkclient gui - Write them!
- Once done, unplug and power on with the power button + volume up. You should get to a menu that lets you select fastboot mode to boot to.
fastboot reboot recoveryto get to recovery- Select “Apply update from ADB”
- Flash the OTA update:
adb sideload ./1.1.1_ota.zip
Afterwards on first boot you will see “Your device is corrupt, you need to reset” - this is expected.
Reset it and boot into a vanilla 1.1.1.
Step 1: Enable ADB and OEM Unlocking
Now you’re ready to actually do the install of Lineage.
Because we’ve rolled back to a generic, fresh state, we’ll need to unlock again.
- On the device, go to Settings > About phone.
- Tap Build number 7 times to enable Developer Options.
- Go to System > Developer options.
- Enable USB debugging.
- Enable OEM unlocking.
- Note: An internet connection may be required for this option to appear.
- If the “OEM unlocking” option is missing at the top, try changing the “Smallest width” (DPI) in Developer Options from 360 to 420. You can revert this change after enabling the option. For some reason the settings layout hides it.
Step 2: Unlock Bootloader
- Connect the Kompakt to your computer.
- Reboot to the bootloader:
adb reboot bootloader - Unlock the device:
fastboot flashing unlock - Press Volume Up on the device to confirm (there will be no visible prompt)
Stay on the same screen and proceed.
Step 3: Flash the GSI
-
Disable Verified Boot (AVB):
Flash the empty vbmeta image while in the bootloader to prevent the device from refusing to boot the custom image.fastboot --disable-verity --disable-verification flash vbmeta vbmeta.img -
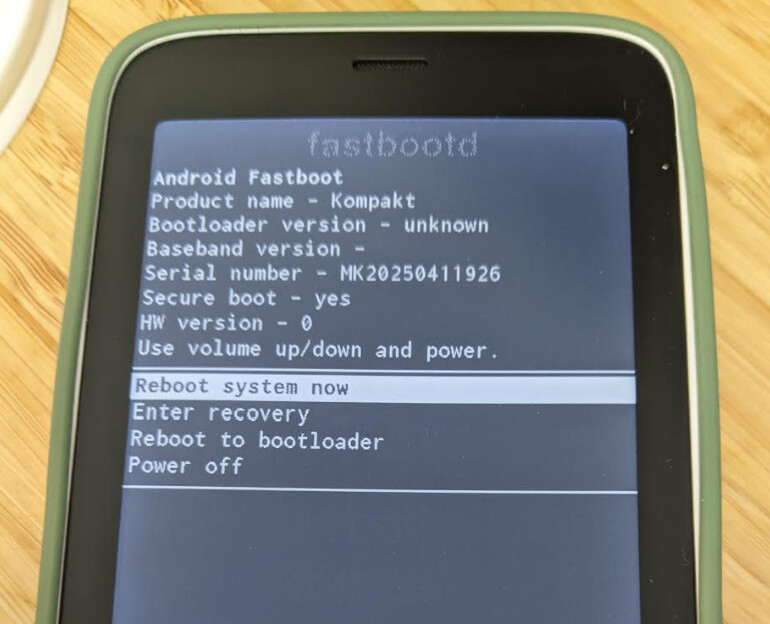
Reboot to fastbootd:
fastboot reboot fastbootThe screen should change to a menu with “fastbootd”.
-
Flash LineageOS:
Erase the current system partition and flash the new image.fastboot erase system fastboot flash system lineage-20.0-20251021-UNOFFICIAL-arm64_bvN.img -
Wipe Data:
To ensure a clean install and avoid migration issues:- Enter recovery.
- Select Wipe data / factory reset from the fastbootd menu on your device.
- Or you can
fastboot -wto wipe data.
-
Reboot:
Select Reboot system now or run:fastboot reboot
You should now boot to Lineage!
Step 4: Post-Install Setup
Necessary System & Phh Treble Settings
Due to this being a generic build of Lineage, there are a few settings that need to be enabled in order to avoid crashes and more complete functionality. Below are the necessary settings.
System Settings:
- Notifications > Notification Light > Disabled
- Accessibility > Color and Motion > Remove animations
Phh Treble Settings:
Go to Settings > Phh Treble Settings to configure these recommended options:
Misc features:
- Force navigation bar disabled > Enabled
- Disable “Voice Call In” router > Enabled
IMS features:
- Install IMS APK for MeditaTek S vendor > Install
- Force the presence of 4G Calling setting > Enabled
Other Recommendations
Matt has a nice repo where all of the settings they enabled are saved!
Please let us know if you find any issues with these or have any suggestions!
Notable ones:
- Rotation performance hint instead of touch > Enabled
- Dynamic FPS > Enabled
- Mediatek GED KPI support > Enabled
- Disable SF GL backpressure > Enabled
- Disable SF HWC backpressure > Enabled
Known Issues
- eSIMs: Existing eSIMs persist, but adding/removing them is untested.
- Notification Light: Will crash if activated.
Step 5: Appendix
You can find more support at the Dumbphones & More Discord server where there are more conversations happening about all things Dumbphone.
With full Android there’s a lot you can do depending on whether you installed Lineage with Google apps or not. You might be interested in installing these additional apps or getting root access.
- Aurora Store: Access apps from the Google Play Store (I would spoof a Redmi 12 4G)
- Droidify: A modern F-Droid client for open-source apps.
microG and Google support
- microG: Install here. Setup instructions via their documentation, this will allow you to recieve push notifications from Google service enabled apps.
Root Access
- Magisk: For root access, patch the
boot.imgfrom your stock firmware and flash the resultingmagisk_patched.imgvia fastboot. You can use the included patched boot and flash it via fastboot.
Recovery
If for any reason you’ve run into an issue or you want to roll back to your stock firmware, it’s quite easy to do once you’ve made a backup with mtkclient.
- Open mtkclient the same way -
python mtk_gui.py - Go to “Write”
- Select the folder where you saved the backup (all partitions should then automatically be selected)
- Click write & wait some time